Thursday, July 21, 2011

Increase Laptop’s Battery Backup with Fixit

Microsoft Fixit application for windows is the best tool to detect the problems and simply FIX them on the go. This application analysis all the default settings with the current applied one and then tell you what things are causing low battery problems and give you a simply option to fix them easily.

Follow the below steps to see how this application works .:

2. Now open the application and you will see something like below .:
Increase Laptop’s Battery Backup with Fixit
3. Now on this windows simply click the Accept Button and move forward to this below page .:
Increase Laptop’s Battery Backup with Fixit
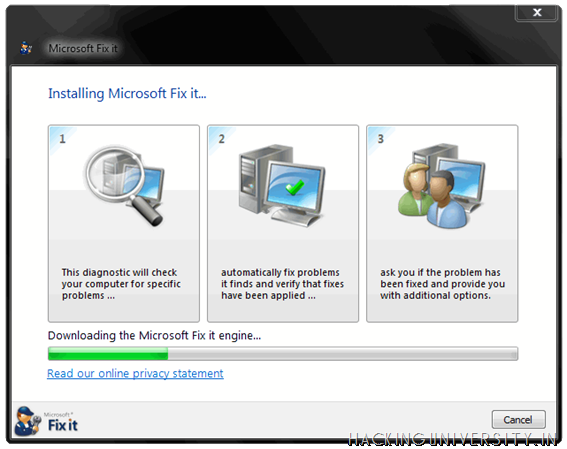
4. Now it will download some file Fixit files for the further process and you will see something like below .:
Increase Laptop’s Battery Backup with Fixit
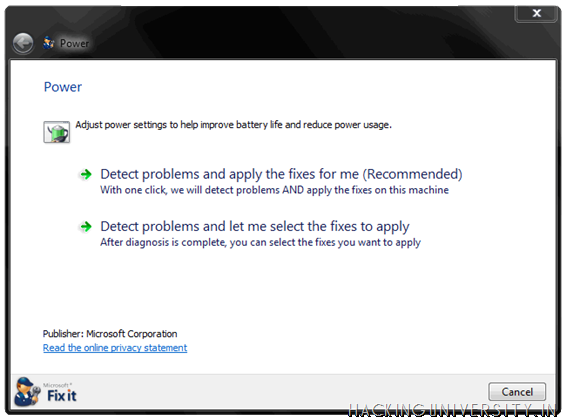
5. Now here you get 2 options .:
  • The first one gives you direct problems searching and Fixing option that is obviously recommended.
  • The second option simply searches for the problem and gives you the option to Fix them separately.
From my recommendation you just click the second option and see what was the real problem.
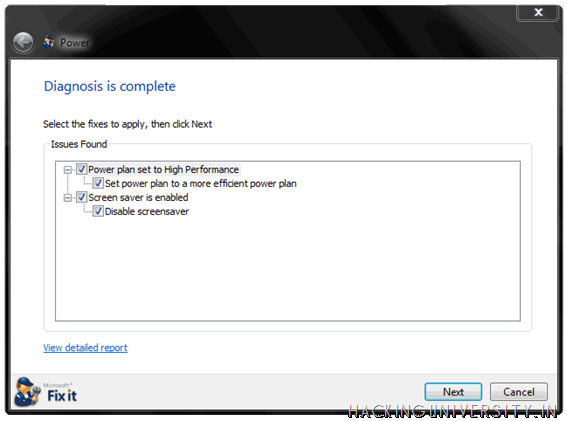
6. Now as soon as I clicked the second option I get the window like below .:
Increase Laptop’s Battery Backup with Fixit
7. So after the diagnostics are complete you will see something like above displaying you the set of problems which are causing the low battery problems so clicking next will Fix them or you can choose which problems you wanna choose and then click next.
Increase Laptop’s Battery Backup with Fixit
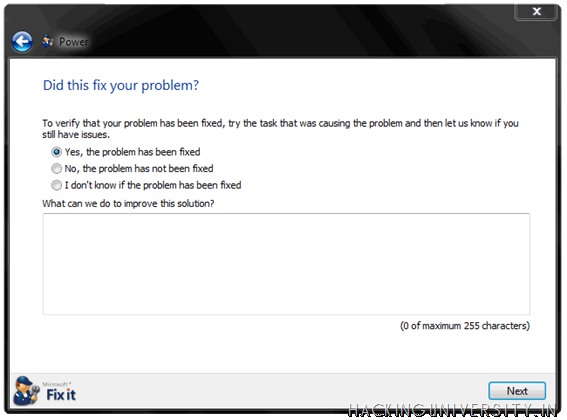
8. That’s it now problem is solved and you can fill up some survey asking you about the problem is that really solved or not. Just fill that and click next and you are done with the solution and now your battery backup may increase.
So NJOY this free tool from Microsoft and gain some more Battery Backup to get more out of your busy life.

How to Convert 1GB Memory Card to 2GB

We all use memory sticks to store music, images, videos so that we can take them on the way to enjoy them easily. But what if memory gets less to store all your music and you don’t have enough money to buy another one, well HackingUniversity has the trick for you to make your 1GB Memory Card to 2Gb.

Follow the below steps .:

1. This trick only works on a 1Gb memory card so make sure your memory card is 1Gb and now follow the below steps.
2. Now remember to backup your data on your memory card as we are going to format that card.
3. Now download Skymedi 2GB Fix Software
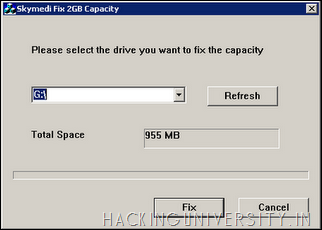
4. After downloading the above software open that software and you will see something like below .:
Convert 1GB Memory Card to 2GB
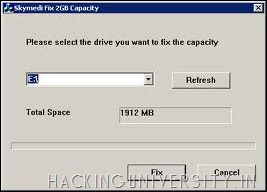
5. In the above image you can see it is saying that Total Space 955 MB, that’s because I have inserted a 1GB memory card so you also have to insert 1 GB card and it will show you the same thing.
6. Now after you insert your card and open the software you just have to click FIX as mentioned in the above image.
7. Now as soon as you click on FIX process will start up and it will you for the confirmation of the formatting step it has to take so click Yes and that’s it.
8. Now after the process is complete just remove the Memory Card and Reinsert it and you will see a gain in the storage space which is really awesome thing for an Non - Investor.
Convert 1GB Memory Card to 2GB
9. Now as you can see the above image is saying 1912 MB for the same 1 GB Memory Card so enjoy this trick and gain some huge space from 1 Gb sticks.
NOTE .: This trick works on some memory cards so just have a try and comment below with a if this worked for you and we are not responsible for any damage this software gives on your memory stick, so use this software @ your own risk.

WinSetupFromUSB – Install Windows XP from USB Flash Drive

This guide will show you, how to use WinSetupFromUSB to create a bootable USB Flash Drive including all Windows source files, plus the following installation of Windows XP. Compare to the different USB_Multiboot versions, WinSetupFromUSB comes with a Graphical User Interface (GUI) and is in my opinion easier to use.

Here you can get the latest version of the program and you will also find many detailed informations about WinSetupFromUSB.
I’ve tested this guide with a 32-bit version of Windows XP and a 64-bit version of Windows Vista and it worked flawlessly.

Prerequisites:

All you need is:
  • a USB Flash Drive with at least 1GB of storage
  • the original Windows XP Setup CD
  • WinSetupFromUSB
If you use nLite to slim down your version of Windows XP, please keep the following in mind:
DO NOT remove “Manual Install and Upgrade”
under Operating System Options!
I also recommend to integrate Service Pack 3 into your Windows XP source files.

1. Preparations

Download and install WinSetupFromUSB. Default installation path is C:\WinSetupFromUSB.
Create a new folder with the name WINXPCD in the root directory of drive C:\ and copy all files from your Windows XP Setup CD into this folder. Depending on your version of Windows XP, the content of C:\WINXPCD should look approximately like this:
Content of WINXPCD
The following files will show you, which Service Pack is already integrated into your CD:
  • WIN51IC.SP1, Sevice Pack 1
  • WIN51IC.SP2, Sevice Pack 2
  • WIN51IC.SP3, Sevice Pack 3

2. Start WinSetupFromUSB

Connect the USB Flash Drive to your PC and start WinSetupFromUSB. It should show up under USB Disk Selection :
WinSetupFromUSB - main window

3. Select your Source Path

Click on Browse under Windows 2000/XP/2003 Source and navigate to the folder with your Windows XP Source Files. It should be C:\WINXPCD:
Browse to Folder
Click OK and C:\WINXPCD should show up under Windows 2000/XP/2003 Source :
WinSetupFromUSB - source path

4. Format USB Flash Drive

PeToUSB or HP Format Tool are used to format the USB Flash Drive. There is no need to download these programs seperately as they are already included in WinSetupFromUSB.
USB Flash Drives up to 2GB should be formatted with PeToUSB in FAT16, USB Flash Drives with 4GB or more with HP Format Tool in FAT32.
I will use PeToUSB to format my Kingston Data Traveler with 2GB.
In the main window of WinSetupFromUSB click PeToUSB under Format target using to start the program. The USB Flash Drive should show up under Destination Drive. Check USB Removable, Enable Disk Format and Quick Format. Uncheck Enable File Copy under File Copy Options :
PeToUSB
Click Start and answer the following two questions “Continue?” with Yes.
All existing volumes and data will be lost!
If everything goes well, the message “Operation Completed Successfully!” should appear. Click OK and close PeToUSB.
The process with HP Format Tool is similar.

5. Copy Windows XP Source Files

To start the process of copying the Windows XP source files to the USB Flash Drive, click GO in the main window of WinSetupFromUSB. Depending on the write speed of your USB Flash drive it may take a while to copy all files.
WinSetupFromUSB - file copy
At the end the following notice about the Windows installation process should be displayed:
WinSetupFromUSB - notice
Click OK and close WinSetupFromUSB with EXIT.

6. Windows Installation – Part 1

Connect the USB Flash Drive to your PC and turn on the computer. Press ESC at the boot screen and you will be able to select the USB Flash Drive as your boot device from the boot menu.
The ESC key is used by ASUS for the Eee PC series.
Other manufacturers may use other keys, e.g. F8 or F12.
After booting from USB Flash Drive, the following menu should be displayed:
  • Windows XP/2000/2003 Setup – First and Second parts
Press Enter or wait 10 seconds to get to the next menu:
  • First part of Windows XP Home Edition setup
  • Second part of XP Home Edition setup+Start Windows for first time
First part of Windows XP Home Edition setup is already selected. Press Enter or wait 10 seconds to start the Text mode part of setup. During this part you can create, delete and format partitions and finally the setup files are copied to your hard disk. At the end the system will restart automatically.

7. Windows Installation – Part 2

After restart, boot the PC again from your USB Flash Drive. The same menu should be displayed:
  • Windows XP/2000/2003 Setup – First and Second parts
Press Enter or wait 10 seconds to get to the next menu:
  • First part of Windows XP Home Edition setup
  • Second part of XP Home Edition setup+Start Windows for first time
Second part of XP Home Edition setup+Start Windows for first time is already selected. Press Enter or wait 10 seconds to start the GUI mode part of setup. During this part you will be asked for your product key, timezone, usernames and other necessary informations. At the end the system will restart automatically.

8. Windows Installation – Part 3

After restart, boot the PC again from your USB Flash Drive. The same menu should be displayed:
  • Windows XP/2000/2003 Setup – First and Second parts
Press Enter or wait 10 seconds to get to the next menu:
  • First part of Windows XP Home Edition setup
  • Second part of XP Home Edition setup+Start Windows for first time
Second part of XP Home Edition setup+Start Windows for first time is already selected. Press Enter or wait 10 seconds to Start Windows for the first time. The Windows installation process will be finished and finally the Windows Desktop will appear.
DO NOT disconnect the USB Flash Drive too early!
At next startup you can boot into Windows from your hard disk.

Notes:

After successsful installation, the following boot menu will always be displayed during startup:
Please select the operating system to start:
  • Microsoft Windows XP Home Edition
  • USB Repair NOT to Start Microsoft Windows XP Home Edition
If you don’t plan to use the repair option and want to boot directly into windows, you have to do the following:
Open the file boot.ini in the root directory of drive C:\ with Notepad:
[Boot Loader]timeout=30
Default=multi(0)disk(0)rdisk(0)partition(1)WINDOWS
[Operating Systems]
multi(0)disk(0)rdisk(0)partition(1)WINDOWS=”Microsoft Windows XP Home Edition” /noexecute=optin /fastdetect
multi(0)disk(0)rdisk(1)partition(1)WINDOWS=”USB Repair NOT to Start Microsoft Windows XP Home Edition” /noexecute=optin /fastdetect
Delete the following line:
multi(0)disk(0)rdisk(1)partition(1)WINDOWS=”USB Repair NOT to Start Microsoft Windows XP Home Edition” /noexecute=optin /fastdetect
DO NOT delete the wrong line!
Your computer may not boot the next time!
Save changes to the file.
At next startup the boot menu will not be displayed.
If you want to keep the repair option, you can reduce the time to display the operating system options from 30 to 5 seconds:
[Boot Loader]
timeout=5
Save changes to the file.
At next startup the boot menu will be displayed only 5 seconds.

Saturday, July 16, 2011

Create Multiboot USB Drive: Install Windows 7, XP From Same USB Drive

Earlier, we have covered some tutorials: 1.How to install windows XP From USB Drive 2. How to install Windows 7 From USB Drive. Both the processes work fine and the readers feedback was positive. But there were some drawbacks with those procedures:
1. Previous methods of creating of the bootable USB drive for Windows XP involves numbers of steps and takes lot of time to complete.
2. You are to use the similar Operating System to prepare the USB disk. i.e if you want to prepare your USB drive to install Windows XP, you’ll have to use Windows XP to apply the preparation method. The similar condition is applicable when preparing the USB drive for Windows 7.
3. Those methods do not have any option to prepare the USB disk in such a way that it would install both Windows XP and Windows 7 after spending one time effort.
But we found an awesome free utility WinSetupFromUSB which comes across  drawbacks and allows you to create a Multiboot USB drive to install Windows XP and Windows 7 from the same USB drive. No need to prepare your USB stick separately. Even the tool works in both Windows XP and Windows 7.

Creating the Multiboot USB Drive for Windows 7 and XP

Creating the multiboot USB drive is too easy and involves four simple steps. Before getting into the process, make sure that the USB drive that you have, is minimum 4 GB of volume (recommended 8 GB) and formatted with FAT32 file system. Once you are ready, download WinSetupFromUSB and extract at any location of your computer.
Then follow the steps below:
1. Insert the formatted USB drive in the USB post of your computer and run the WinSetupFromUSB_1-0-beta7.exe.
2. Make sure that the the utility has detected your USB drive.
3. Now enable the option Windows 2000/XP/2003 Setup selecting the check box and browse to the Windows XP installation file location. Next, enable the option Vista/7/Server 2008 Setup/PE/RecoveryISO and browse to the Windows 7 installation files’ location. In both of the cases, if you have the ISO images, extract them by WinRar or 7-Zip.
4. Click the Go button to get started. It might take several minutes.
Though we have discussed the process for only Windows XP and Windows 7, you can also add Windows Vista as well as Linux.

Saturday, March 26, 2011

How to use Kaspersky Free after 30 days trial period ?

Kaspersky is one of the top security software providing best protection to your data from latest Viruses, worms, phishing attacks, malware, etc. I’ve now found a 100% working trick, using which one can use Kaspersky Antivirus 2010 and Kaspersky Internet Security 2010 after end of its 30 days trail for Free.
Follow the steps below carefully to do it:
1. Open Kaspersky settings > Options and uncheck Enable Self-Defense. Click Ok.
2. Exit Kaspersky.
3. Go to Start, open Run, then type regedit and press enter.
4. Under Registry Editor, open HKEY_LOCAL_MACHINE > SOFTWARE > Kaspersky Lab > protected > AVP9 > environment.
registry
5. Find the entry ProductStatus and change Release to Beta.
6. Press OK then open Kaspersky.
7. Under License, Activate beta license then press Next and Finish (Delete any trial keys first if any, as they wont work).
8. Re-enable Self-Defense from options.
activated kaspersky
9. Now you have 30 days of beta license activated. After every 30 days, simply click Activate Beta (delete the expired beta key first) and enjoy another 30 days Free :D
Kaspersky will now show as Beta Version though it is your final version only. Enjoy!

Update – How to delete the expired key & activate beta license ?


To delete beta key, open Kaspersky > License Manager and click on the red X (cross) next to the code. Then click on Yes button as shown in below image.
deleting kaspersky key
Now click ‘Activate New License’ option and then chose ‘Activate beta license’. Click Next to activate kaspersky.
activating beta license
Update (28 Jan) – As pointed out by most readers, I also got the same error saying ‘key is blocked’. I guess, Kaspersky has finally figured out this loophole and fixed it via updates :(
Update (29 Jan) – Finally another way is out! Our smart readers ‘Stalin & Mr. Fix it’ have provided a quick and simple solution via comments to use Kaspersky for FREE :) Check the new procedure below:
1. Delete any license keys first.
2. Disable Self-Defense and Exit kaspersky.
3. Following above steps, change the ProductStatus back to Release in registry.
4. Double click PCID and change the last 3 digits to what ever you want and click Ok.
PCID
5. Exit registry editor and restart kaspersky.
6. Select activate trial license and you should now have 30 or 31 days remaining. Repeat this method any time to reset to 30 days.
UPDATEKaspersky Trial Reset tool [Use Kaspersky for Free after 30 days]
Disclaimer: This article is for informational and educational purposes only. We advice you to purchase genuine license to run your software.

Tuesday, March 15, 2011

Reliance Free GPRS Trick/Hack (Free Internet With Rs. 99 Plan!) (January, 2011)

Here’s a trick to use free GPRS on your reliance mobile number without changing any APN, PORT and other settings. All you need to do is follow the below mentioned steps and get 2.5 GB of usage free! By following the steps reliance Rs. 99 plan will be activated on your mobile number:
  1. Visit this link: http://bit.ly/idlPnA and enter the details asked for (Name and reliance mobile phone number).
  2. You will receive a text message with a pin code (password for the next step).
  3. Now visit this link: http://bit.ly/gYvjIU and use the Pin code acquired in the above step and enter it.
  4. That’s it! Rs. 99 GPRS plan will be activated on your reliance mobile number.
In case the link in Step 3 doesn’t work, visit this url instead: http://bit.ly/h4Wexj. You can try this url along with the url mentioned in Step 3 to get additional GPRS usage but be careful as it might also lead to deactivation of service. And do leave a comment in case you are able to get this trick (hack) working :)
Note: All the tricks/hacks shared are making use of the loop holes in Reliance’s network. None of these tricks/hacks have been discovered/made/influenced by me. Please use them at your own risk.

Monday, March 14, 2011

How to create a locked folder in Win XP

To create a locked folder we need to create two batch files. The first batchfile will “lock” the folder (actually it will turn the ordinary folder into a link to the Control Panel using an address code), and the other one  will “unlock” it. When someone tries to access that folder, he will be redirect to Control Panel(we can in fact type in any address code so that the user could be redirected to wherever we want). You should hide these batch files, especially the second one.
1. Create a folder, that you will use to store your protected data. For this example, I created a folder called “locked”, and put that folder in My Documents.
create a locked folder
2. Open Notepad and copy this code ren “FOLDERNAMEFOLDERNAME.{21EC2020-3AEA-1069-A2DD-08002B30309D}
“FOLDERNAME” change in to name of your folder, in this example “FOLDERNAME” is locked.My code looks like this ren locked.{21EC2020-3AEA-1069-A2DD-08002B30309D} locked
Save notepad file like lock.bat in My Documents. In option Save as Type, select All Files
create a locked folder
3. Open another notepad file and copy this code ren FOLDERNAME.{21EC2020-3AEA-1069-A2DD-08002B30309D} “FOLDERNAME” , Save file as in Step 2, just choose a different filename , like unlock.bat
After this we can see in My Documents something like this:create a locked folder
If we open (double click) lock.bat our folder will turn into a link to Control Panel, and the files will not be visible. until we use unlock.bat
create a locked folder
Here is video guide

Command Prompt Hacks |How to hide partition

Here is an interesting command prompt hack .You can hide, assign, delete etc. disk partition in few steps.
1.Select Start , then Run , in Run option type cmd. (or  start->All Programs->Accessories->Command Prompt)
2.In Command Prompt (cmd) type DISKPART

3. Then type LIST VOLUME, after this you will get an partition  overview, as shown below
4. Type SELECT VOLUME (number) , press ENTER on keyboard, then type  REMOVE LETTER (letter )as shown below
5.After this disk partition will be hidden. How to return disk partition? Easy, just type ASSIGN LETTER (letter), as shown beloww
With Command Prompt (cmd) , you can manipulate  disk partition. Here is list of possibility:

How To Hide Any Drive Through Command Prompt

Have you ever thought of hiding any drive from your system so that no one can knew about it. You may have heard or even used a lot of software’s that might be able to do that, but if you are GEEK like me and want to do things by your own without using any 3rd party software than this tutorial will show you how you can do it.
Well there are 3 ways of doing it, in this tutorial we are covering command prompt way of doing it.


Here is how to do it:


Step 1. Open command Prompt, go to Start Menu > All Programs >Accessories > Command prompt
Step 2. In the Command Prompt, type Diskpart and hit enter key. If UAC (User Account Control), dialog-box prompts than click Yes.
Step 3. Then type List Volume and press enter, this will produce the list of all drives.

Step 4. Now select the drive which you want to hide, you can either do this by typing Select Volume 1 (i.e. Volume Number) or by typing Select Volume C(i.e. Drive letter)

Step 5. To hide a drive, type Remove Letter C. Here, C is the drive letter than you want to hide. You can use any drive letter you want.

Step 6. That’s it. You are done! C drive is now hidden


How to unhide hidden drive


Step 1. Follow the procedure mentioned in step 1, 2, 3 and 4.
Step 2. To show the hidden drive type Assign Letter C and hit enter, now you can view C: drive in explorer.


That’s it. This is one way of hiding and un-hiding drives from explorer, for rest two stay tuned.

How to Hack Into a Windows XP Computer Without Changing Password

Yesterday I talked about how to “Recover Windows Login password within minutes“. Another method to login to a password protected Windows even if you do not have the password is by making Windows accepting any passwords.
There is a far better way to get into Windows XP. It is easy and it does not reset the password. Hack into a computer running Windows XP without changing the password and find out all and any passwords on the machine (including admin accounts). You do not need access to any accounts to do this. Of course, do not do this on anyone elses computer without proper authorisation.
Bypass Windows Login screen 

Steps to Hack into a Windows XP Computer without changing password:
1. Get physical access to the machine. Remember that it must have a CD or DVD drive.
2. Download DreamPackPL HERE.
3. Unzip the downloaded dpl.zip and you’ll get dpl.ISO.
4. Use any burning program that can burn ISO images.
5. After you have the disk, boot from the CD or DVD drive. You will see Windows 2000 Setup and it will load some files.
6. Press “R” to install DreamPackPL.
7. Press “C” to install DreamPackPL by using the recovery console.
8. Select the Windows installation that is currently on the computer (Normally is “1″ if you only have one Windows installed)
9. Backup your original sfcfiles.dll by typing:
ren C:\Windows\System32\sfcfiles.dll sfcfiles.lld” (without quotes)
10. Copy the hacked file from CD to system32 folder. Type:
copy D:\i386\pinball.ex_ C:\Windows\System32\sfcfiles.dll” (without quotes and assuming your CD drive is D:)
11. Type “exit”, take out disk and reboot.
12. In the password field, type “dreamon” (without quotes) and DreamPack menu will appear.
13. Click the top graphic on the DreamPack menu and you will get a menu popup.
Hack Windows Login Dreamon
14. Go to commands and enable the options and enable the god command.
Bypass and hack user account passwords
15. Type “god” in the password field to get in Windows.
You can also go to Passwords and select “Logon with wrong password and hash”. This option allows you to login with ANY password.
Note: I was unable to bring up the DreamPackPL for the first time because I have Kaspersky Anti-Virus already running in background. I believe most antivirus already labelled this tool as a Hack-Tool. A Hack-Tool is NOT a virus. DreamPackPL helps you bypass the Windows Login screen and it is not destructive.

Automatic Shortcut Viewer For Removable Storage Media In Desktop

You might have seen in Linux based OS like Ubuntu, whenever you insert a removable storage media in to your computer a shortcut to the storage device automatically appears in the desktop. If you are one of those who are keenly interested to get such feature in your Windows 7 or Windows XP or Windows Vista than have a rest on reading this article.

There are some free software that helps you to make this thing really possible. Upon researching various tools like these, I found one of them very useful and worthy to use.

This freeware I am talking about provide the user with automatic shortcuts to their USB and other drives that appear and disappear from the desktop as the user plugs their media in and out. The hero’s name is Desktop Media.

The best thing about this utility is that it uses very small amount of your Randomly Accessed Memory.
Automatic shortcut created
When drive is removed
Besides usual removable media shortcuts you can also add network shortcuts and even shortcut to your fixed drive.
To enable the plug and play shortcut just download and install the 300 KB file from the link below

The system tray icon will always show up in the system tray or notification area.
If you don’t want to see Desktop Media in system tray you can hide it from the options menu. Right click on the Desktop Media icon and choose Options, uncheck Show Tray Icon.
Hope this tutorial was helpful and useful.

Tuesday, March 8, 2011

Add Copy To / Move To to the Windows Explorer Right Click Menu

A hidden functionality in Windows allows you to right click on a file, select Copy To Folder or Move To Folder, and the move to box will pop up and let you choose a location to either copy or move the file or folder to.
Update: Downloadable version also available.
Here’s the quick registry hack to get this working. As usual, back up your registry just in case. You will want to browse down to this key:
HKEY_CLASSES_ROOT\AllFilesystemObjects\shellex\ContextMenuHandlers
Once you are at that key, right click and choose the New Key option:
Now you will double-click on the (Default) value and enter the following:
{C2FBB630-2971-11D1-A18C-00C04FD75D13}
Click OK and continue.
If you want to enable Move To, you will repeat the same steps, except creating a new key named Move To, and using this value:
{C2FBB631-2971-11D1-A18C-00C04FD75D13}
Now when you right click on a file or folder, you should see the following options:
Let’s click Copy To Folder just to see what happens….
And that’s it. Useful!